|
| Page 52-53 of TGBBO Big Book of Baking |
The Recipe
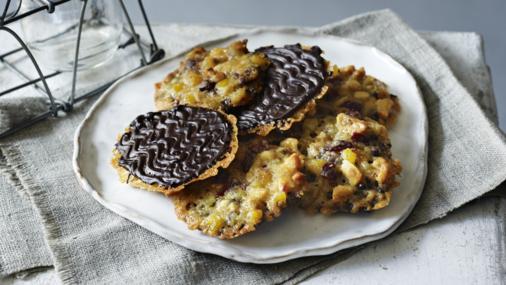
Florentines

Florentines are a lacy Italian cookie (or biscuit as the English say) made of chopped nuts and candied fruits, sugar or syrup, and butter. They are most often coated with a layer of chocolate. Traditionally, they do not contain eggs and little to no flour.
Florentines are a lacy Italian cookie (or biscuit as the English say) made of chopped nuts and candied fruits, sugar or syrup, and butter. They are most often coated with a layer of chocolate. Traditionally, they do not contain eggs and little to no flour.
Ingredients
- 50g (1¾ oz) butter
- 50g (1¾ oz) demerara sugar
- 50g (1¾ oz) golden syrup
- 50g (1¾ oz) plain flour
- 25g (1oz) dried cranberries or glacé cherries, finely chopped
- 50g (1¾oz) candied peel, finely chopped
- 25g (1oz) almonds, finely chopped
- 25g (1oz) walnut pieces, finely chopped
- 200g (7oz) plain chocolate (70% cocoa solids)
Directions
- Preheat the oven to 180C/350F/Gas 4. Line three baking trays with baking parchment or silicon sheets.
- Measure the butter, sugar and syrup into a small pan and heat gently until the butter is melted. Remove from the heat and add the flour, chopped cranberries or cherries, candied peel and nuts to the pan. Stir well to mix.
- Make 18 florentines by spooning six teaspoonfuls of the mixture on to each of the prepared baking trays, leaving plenty of room for them to spread during cooking.
- Bake for 8-10 minutes, or until golden-brown. Leave the florentines to cool before lifting onto a cooling rack using a palette knife (if the florentines have been baked on greased baking trays, then allow them to harden for a few moments only before lifting onto cooling racks to cool completely). If the florentines become too hard to remove, then pop them back into the oven for a few minutes to allow them to soften.
- Set a heatproof bowl over a pan of simmering water, without letting the bowl touch the water. Temper the chocolate by breaking half of the chocolate into the bowl. Stir until the chocolate reaches a melting temperature of 53C/127F. Meanwhile, finely chop or grate the remaining chocolate.
- Carefully remove the bowl from the pan, add the rest of the chocolate and stir gently until the chocolate has cooled to 26C/79F.
- Spread a little melted chocolate over the flat base of each florentine and leave to cool slightly before marking a zigzag in the chocolate with a fork. Leave to set, chocolate side up on a cooling rack. Store in an airtight container.
This recipe contains two types of sugar that might not be familiar to some, especially outside of the UK: Demerara sugar and Golden Syrup.
Demerara Sugar
 |
| Sugar Man! |
Demerara sugar is a minimally-refined raw cane sugar that's usually used to sweeten beverages. The crystals are larger and lighter in color than the more familiar turbinado sugar.I couldn’t find any demerara sugar locally and I don’t have my own personal sugar man service (at least at this time). I didn’t want to order online and wait, so I ended up using regular brown sugar in the same weight amount.
I realized after the fact, I could have used Turbinado sugar in its place, as it is quite similar, just a different texture. Most of you will be familiar with turbinado sugar if you have ever gone to a coffeehouse. It’s the sugar in the “Sugar in the Raw” packets you find sandwiched between the other dozen or so sweetener choices. I have found turbinado sugar in nearly every grocery store, but I have yet to buy it. I have oodles of “Sugar in the Raw” packets squirreled away in drawers from various coffee events (I don’t put sugar in my coffee, but apparently, I look the type since I’m always given several packets per cup). I will note this for next time.
Golden Syrup
 |
| Maybe I'll go into the sugar biz. |
Golden Syrup
Golden Syrup, also referred to Light Treacle, is a thick golden amber-colored inverted sugar syrup. It has the consistency of a thin honey. The sweet syrup is actually a natural by-product of refining cane sugar. It widely available in most countries and a traditional staple in England. It can be used as sweetener with everything from pancakes to pie, much like corn syrup. Many people use it as a substitute for honey, as it does have a somewhat similar flavor – sweet, almost buttery flavor, and doesn’t have the candy-sweet aftertaste like corn syrup (in my opinion).
Although it may be difficult to find in a regular grocery store, it can be found at specialty stores, such as World Market, Whole Foods and it’s readily available online. I happened to find it at Whole Foods when shopping with my mom. It’s not as cheap as corn syrup, but, in my opinion, it has a far superior taste to corn or Karo Syrup and I can see myself opting for it whenever possible. It could become costly if you were using it recipes that called for large amounts of it, but for recipes like this, I have plenty to last me. You could probably find it cheaper online as well. Do be aware, if you are thinking of replacing one for the other, I have heard that there are complex sugar differences between corn syrup and golden syrup, especially when it comes to crystallization, that could make drastic differences in your baking. Be sure to do a quick Google search to see how others have fared in the process.
When you start baking, you discover there’s a world of sugars out there. A handy guide to all types of sugars can be found here:
There’s a ton of information on syrups out there. Here is one to get started:
http://www.formaggiokitchen.com/blog/getting-to-know-your-syrups-molasses-sorghum-cane-syrup-and-golden-syrup
This was my first technical challenge. The bakers were give one and a quarter hours to bake 18 florentines.
I wasn’t looking forward to this. I have avoided making candied peel because I know how long and painstaking the process can be. Oh, candied peel purists used to tell me it “really isn’t that difficult” all whilst having one hand supporting their backache and hiding the other with fresh scrapes across the fingers, wincing while citrus juice oozed into the open wounds. I seriously considered going out and buying it (the bakers were provided with a handy little jar of it, quite possibly to avoid a meltdown), until I stumbled upon Alton Brown’s article about candied peel. SO MUCH EASIER to make this way. Use the peeler! The peeler is your friend and saves so much time and many Band-Aids. You can get the pith off much easier without all the scraping and his cooking method is quicker and easier than the traditional way I knew about. Try it. You might be whipping up batches for holiday treats before you know it.
http://altonbrown.com/candied-orange-peel-recipe/
After all the chopping and candying, it was time to make the actual cookie mix.
 I used Mary’s trick for getting uniform-sized cookies. I divided the mix into three and then scoop six spoonfuls from each. It worked pretty well, not perfect, but not bad, and much faster than weighing and measuring. Be sure to give them lots of room to spread on the baking sheet. Also, make sure watch them carefully. They can over bake quickly, causing burnt edges and dried out fruits.
 As for coating the florentines with the chocolate, that didn’t fare as well. The chocolate was pretty much everywhere. Kind of looked as if some tragic accident happened on my counter in an old black and white movie. So much so, I couldn’t even get a picture due to the fact that I didn’t want even imagine what would happen if I chocolate-dipped my ancient iPhone, coating the inner workings. There is no amount of rice that would ever draw that out!

This was my first technical challenge. The bakers were given one and a quarter hours for the bake. Needless to say, I did NOT finish in the time allotted. In my defense, I did not have the advantage of a dedicated tent, years of baking expertise and two charmingly cheeky hosts spouting puns of encouragement. I was in my kitchen, I had to take two calls, the mailman showed up with an amazon box, the cat informed me that his mealtime does not wait for any bake… Plus, I made my own candied orange peel, which was provided in the technical challenge, so that added at least an hour to my time. However, I did have the advantage of a full recipe, seeing the correct way to make them on the episode AND Mary’s masterclass episode, so I should have been ahead of the game. All and all, it was an exhausting afternoon. However, the results were worth it.
I know my mom would have enjoyed these. I also know she would insist I give you this warning, as I could hear her saying it in my head: “Be sure to brush and floss after!” It’s a legit reminder. The dried fruits and candied peel will stick Oreo-style in your molars and form a nice sugar-coating across your gum-lines. Unless you enjoy hanging out with your dentist as he or she drills into your enamel, I would listen to her. I brushed and flossed, Mom. Thanks for the reminder. :)

http://www.formaggiokitchen.com/blog/getting-to-know-your-syrups-molasses-sorghum-cane-syrup-and-golden-syrup
The Bake
This was my first technical challenge. The bakers were give one and a quarter hours to bake 18 florentines.
Chopping the fruit and nuts does take a bit of time, and my knife skills are not the best, so not all the fruits and nuts came out to a nice, fine, uniform size, but I didn’t do too bad. One could put them in a food processor or chopper, but watch that you don’t pulverize them too small.
The Candied Peel
 |
| Prepare to be candied! |
After all the chopping and candying, it was time to make the actual cookie mix.
 |
| Golden syrup, butter and sugar. |

 |
| Lacy enough to peek through! |
It has been a long time since I worked with chocolate and I had never done too much chocolate work in general. I was a little nervous about melting and tempering the chocolate (Tempering is a process to make your melted chocolate glossy and smooth appearance and texture. It gives it that snap. If not tempered, chocolate will appear waxy, gray, and you can see where the cocoa fat has separated).
As Mary Berry said in her masterclass on this recipe “Remember, chocolate melts in a child’s pocket so you don’t need intense heat underneath” I kept the heat low, added the chocolate at different times as instructed and the chocolate tempered fairly well.
 As for coating the florentines with the chocolate, that didn’t fare as well. The chocolate was pretty much everywhere. Kind of looked as if some tragic accident happened on my counter in an old black and white movie. So much so, I couldn’t even get a picture due to the fact that I didn’t want even imagine what would happen if I chocolate-dipped my ancient iPhone, coating the inner workings. There is no amount of rice that would ever draw that out!
I used a pastry brush to coat the chocolate on the back of the cookies, but it did drip everywhere and I had some trouble getting the chocolate to set. It could have been a couple of things: the type of chocolate I used, the humidity in the kitchen that day, or I didn’t let it cool down enough. Eventually I did get all 18 coated with the chocolate, probably a little thicker than required, but I’m all for a thick layer of chocolate. The zig-zags proved to be a little tricky. The chocolate wasn’t holding the shape I kept moving my hand the wrong way, but I got the hang of it. They came out a bit untidy, but not terrible.
The Results
Not too shabby! Not sure if I would have made “Star Baker” but I think it would have done all right.
 |
| Presented on the Gingham Alter. |
These are super tasty!!! Chewy and slightly crisp and quite decadent. You get lots of flavor in each bite. As Mary Berry mentioned, they are little like a Brandy Snap, with fruit and chocolate instead of the brandy flavor. So good and very hard to stop at one!

Once you get the hang of it, I’m sure making these would become much quicker and easier, especially if you already have your candied peel and fruits chopped ahead of time. You could also do the chocolate layer at a different time if you wanted to break up the baking time as well. Lots of options once you get the steps down. I’m curious of how these would bake and taste if I added chocolate bits to the cookie itself instead of spreading the chocolate on the back. Not as decadent, but might be something I experiment with at a later date.
 |
| No time to focus the camera. Must eat florentines now! |